 HTML&CSS辞典
  Mastodonをインストールしたい人
Xserver VPSにMastodonをインストールする方法を知りたいな!
この記事は上記のような疑問を解消するものとなっています。
- Xserver VPSとは?
- Xserver VPSにMastodonをインストールする方法
Mastodonを導入したいという方はいませんか?
Mastodon(マストドン)は、Twitterのような投稿ができる分散型ソーシャルネットワークを実現するオープンソースソフトウエアです。
Xserver VPSを利用すると誰でも簡単にMastodonをインストールすることができます。
そこでこの記事ではXserver VPSにMastodonをインストールする方法をまとめてみました!
気になる方は是非最後まで読んでいただければと思います。
\Mastodonインストールテンプレート提供/
【2024年7月1日まで】利用料金20%をキャッシュバック!初期費用無料!月額664円から使える!
Xserver VPSとは?
\Mastodonインストールテンプレート提供/
【2024年7月1日まで】利用料金20%をキャッシュバック!初期費用無料!月額664円から使える!
- 圧倒的ハイコストパフォーマンス
- CPUもストレージも圧倒的ハイスペック
- 快適なネットワーク環境
- 「Minecraft」でマルチプレイがすぐに楽しめる
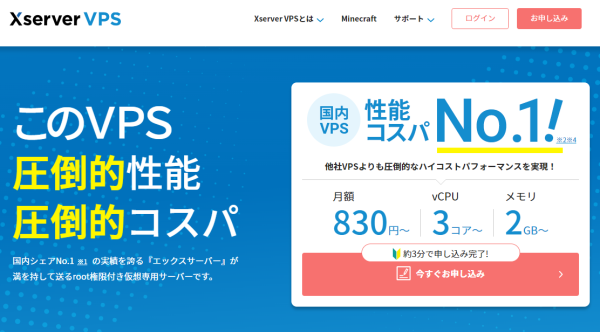
Xserver VPSは国内シェアNo.1レンタルサーバー「エックスサーバー」が満を持して送るVPSサービスです。
19年以上積み重ねた豊富なサーバー運用実績と安定したサーバー環境を提供する確かな技術力を元に、最高品質のサービスを提供し続けています。
月額470円でvCPU3コア、メモリ2GBといったハイスペックなサーバーが使える国内最安クラスのハイコストパフォーマンスを実現しています。
仮想専用サーバーであるためレンタルサーバーと比較して他のユーザーの影響を受けにくくなります。
また、この価格でアプリケーション開発、Minecraft用サーバー構築からサイト・ブログ制作まで様々な用途において利用できるサーバーの管理者権限(root権限)が付与されます。
少しでも気になるという方は是非Xserver VPSを利用してみてはいかがでしょうか?
\Mastodonインストールテンプレート提供/
【2024年7月1日まで】利用料金20%をキャッシュバック!初期費用無料!月額664円から使える!
Xserver VPSにMastodonをインストールする方法
Xserver VPSにMastodonをインストールする方法をみていきましょう。
\Mastodonインストールテンプレート提供/
【2024年7月1日まで】利用料金20%をキャッシュバック!初期費用無料!月額664円から使える!
SMTPが利用できるメールサーバーと独自ドメインを事前にご準備ください。
Mastodonアプリケーションイメージインストール手順
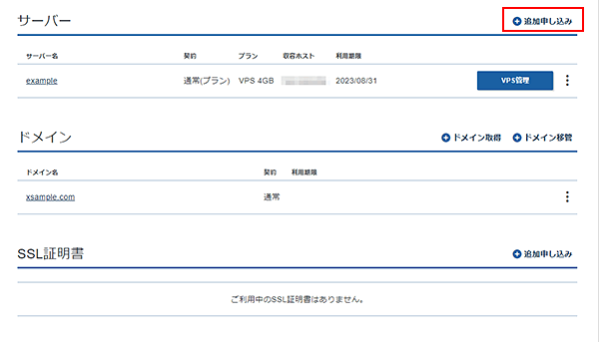
Xserverアカウントへログインし、「追加申し込み」をクリックしてください。
「イメージタイプ」における「アプリケーション」タブより「Mastodon」をクリックしてください。
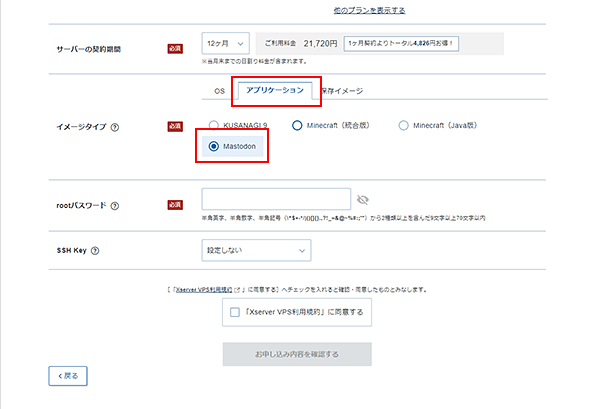
お申し込み・お支払いを完了することでサーバーへ自動でインストールされます。
Mastodonセットアップ手順
テキストエディタで以下の「/etc/nginx/sites-available/Mastodon」ファイルを編集します。
「example.com」になっている箇所を「Mastodon」のサーバーに設定するドメイン名に置き換えてください。
※「example.com」は全部で4箇所あります。
map $http_upgrade $connection_upgrade {
default upgrade;
” close;
}
upstream backend {
server 127.0.0.1:3000 fail_timeout=0;
}
upstream streaming {
server 127.0.0.1:4000 fail_timeout=0;
}
proxy_cache_path /var/cache/nginx levels=1:2 keys_zone=CACHE:10m inactive=7d max_size=1g;
server {
listen 80;
listen [::]:80;
### server_nameにドメインを記述 ###
server_name example.com
root /home/mastodon/live/public;
location /.well-known/acme-challenge/ { allow all; }
location / { return 301 https://$host$request_uri; }
}
server {
listen 443 ssl http2;
listen [::]:443 ssl http2;
### server_nameにドメインを記述 ###
server_name example.com
ssl_protocols TLSv1.2 TLSv1.3;
ssl_ciphers HIGH:!MEDIUM:!LOW:!aNULL:!NULL:!SHA;
ssl_prefer_server_ciphers on;
ssl_session_cache shared:SSL:10m;
ssl_session_tickets off;
# Uncomment these lines once you acquire a certificate:
### Let’s Encryptで作成する証明書の設置場所を指定 ###
#ssl_certificate /etc/letsencrypt/live/example.com/fullchain.pem;
#ssl_certificate_key /etc/letsencrypt/live/example.com/privkey.pem;
keepalive_timeout 70;
sendfile on;
client_max_body_size 80m;
root /home/mastodon/live/public;
gzip on;
gzip_disable “msie6”;
gzip_vary on;
gzip_proxied any;
gzip_comp_level 6;
gzip_buffers 16 8k;
gzip_http_version 1.1;
gzip_types text/plain text/css application/json application/javascript text/xml application/xml application/xml+rss text/javascript image/svg+xml image/x-icon;
location / {
try_files $uri @proxy;
}
# If Docker is used for deployment and Rails serves static files,
# then needed must replace line `try_files $uri =404;` with `try_files $uri @proxy;`.
location = /sw.js {
add_header Cache-Control “public, max-age=604800, must-revalidate”;
add_header Strict-Transport-Security “max-age=63072000; includeSubDomains”;
try_files $uri =404;
}
location ~ ^/assets/ {
add_header Cache-Control “public, max-age=2419200, must-revalidate”;
add_header Strict-Transport-Security “max-age=63072000; includeSubDomains”;
try_files $uri =404;
}
location ~ ^/avatars/ {
add_header Cache-Control “public, max-age=2419200, must-revalidate”;
add_header Strict-Transport-Security “max-age=63072000; includeSubDomains”;
try_files $uri =404;
}
location ~ ^/emoji/ {
add_header Cache-Control “public, max-age=2419200, must-revalidate”;
add_header Strict-Transport-Security “max-age=63072000; includeSubDomains”;
try_files $uri =404;
}
location ~ ^/headers/ {
add_header Cache-Control “public, max-age=2419200, must-revalidate”;
add_header Strict-Transport-Security “max-age=63072000; includeSubDomains”;
try_files $uri =404;
}
location ~ ^/packs/ {
add_header Cache-Control “public, max-age=2419200, must-revalidate”;
add_header Strict-Transport-Security “max-age=63072000; includeSubDomains”;
try_files $uri =404;
}
location ~ ^/shortcuts/ {
add_header Cache-Control “public, max-age=2419200, must-revalidate”;
add_header Strict-Transport-Security “max-age=63072000; includeSubDomains”;
try_files $uri =404;
}
location ~ ^/sounds/ {
add_header Cache-Control “public, max-age=2419200, must-revalidate”;
add_header Strict-Transport-Security “max-age=63072000; includeSubDomains”;
try_files $uri =404;
}
location ~ ^/system/ {
add_header Cache-Control “public, max-age=2419200, immutable”;
add_header Strict-Transport-Security “max-age=63072000; includeSubDomains”;
try_files $uri =404;
}
location ^~ /api/v1/streaming {
proxy_set_header Host $host;
proxy_set_header X-Real-IP $remote_addr;
proxy_set_header X-Forwarded-For $proxy_add_x_forwarded_for;
proxy_set_header X-Forwarded-Proto $scheme;
proxy_set_header Proxy “”;
proxy_pass http://streaming;
proxy_buffering off;
proxy_redirect off;
proxy_http_version 1.1;
proxy_set_header Upgrade $http_upgrade;
proxy_set_header Connection $connection_upgrade;
add_header Strict-Transport-Security “max-age=63072000; includeSubDomains”;
tcp_nodelay on;
}
location @proxy {
proxy_set_header Host $host;
proxy_set_header X-Real-IP $remote_addr;
proxy_set_header X-Forwarded-For $proxy_add_x_forwarded_for;
proxy_set_header X-Forwarded-Proto $scheme;
proxy_set_header Proxy “”;
proxy_pass_header Server;
proxy_pass http://backend;
proxy_buffering on;
proxy_redirect off;
proxy_http_version 1.1;
proxy_set_header Upgrade $http_upgrade;
proxy_set_header Connection $connection_upgrade;
proxy_cache CACHE;
proxy_cache_valid 200 7d;
proxy_cache_valid 410 24h;
proxy_cache_use_stale error timeout updating http_500 http_502 http_503 http_504;
add_header X-Cached $upstream_cache_status;
tcp_nodelay on;
}
error_page 404 500 501 502 503 504 /500.html;
}
Let’s EncryptでTLSの証明書を取得・設定します。
Mastodonに使用するドメイン名で下記を実行します。
certbot certonly –standalone -d (ドメイン名)
systemctl start nginx
certbot certonly –webroot -d (ドメイン名) -w /home/mastodon/live/public/
「証明書の期限切れ時や緊急時の連絡に使用するメールアドレスの入力」「利用許諾への同意」などが聞かれます。
なお、入力するメールアドレスはSMTPで設定しておく必要があります。
また、「Selec the appropriate number [1-2]:」と聞かれた場合は、2を入力してください。
TLS証明書の自動更新の設定をします。
「/etc/cron.d/letsencrypt-renew」を作成し、以下を書き込んで保存してください。
0 0 1 * * root certbot renew –pre-hook “service nginx stop” –post-hook “service nginx start”
以下のコマンドでcronによる定期実行を有効にします。
systemctl restart cron
Mastodonの設定を行います。
以下のコマンドを実行し、設定ウィザードを起動してください。
su – mastodon
cd ~/live
RAILS_ENV=production bundle exec rake mastodon:setup
| 設定する値 | 説明 |
|---|---|
| Domain name: | nginxの設定やlet’s encryptの設定で入力したドメイン名を入力してください。 |
| Do you want to enable single user mode? (y/N) | シングルユーザモードとして設定を行うかどうかの項目です。 シングルユーザモードの設定をしない場合、何も入力せずEnterキーを押してください。 |
| Are you using Docker to run Mastodon? (Y/n) | DockerのコンテナとしてMastodonを起動しているかどうかを確認されている項目です。 Xserver VPSのMastodonはDockerを使用していないのでnを入力します。 |
| PostgreSQL host: (/var/run/postgresql) | 何も入力せずEnterキーを押してください。 |
| PostgreSQL port: (5432) | 何も入力せずEnterキーを押してください。 |
| Name of PostgreSQL database: (mastodon_production) | PostgreSQL内における、Mastodonデータベース名「/etc/motd」の「PostgreSQL mastodon db name」項目の値を入力してください。 |
| Name of PostgreSQL user: (mastodon) | PostgreSQL内における、Mastodonデータベースに接続するユーザ名「/etc/motd」の「PostgreSQL mastodon user name」項目の値を入力してください。 |
| Password of PostgreSQL user: | PostgreSQL内における、Mastodonデータベースに接続する際のパスワード「/etc/motd」の「PostgreSQL mastodon user password」の項目の値を入力してください。 |
| Redis host: (localhost) | 何も入力せずEnterキーを押してください。 |
| Redis port: (6379) | 何も入力せずEnterキーを押してください。 |
| Redis password: | 何も入力せずEnterキーを押してください。 |
| Do you want to store uploaded files on the cloud? (y/N) | Mastodonに投稿された画像や動画などのファイルをクラウドサービスのオブジェクトストレージにアップロードするかどうかを設定する項目です。 設定は任意です。Yを選ぶとオブジェクトストレージへアップロードする際に必要な認証情報などが追加で求められます。 |
| Do you want to send e-mails from localhost? (y/N) | Mastodonのアカウント作成や各種通知を送るメールをlocalhostから送信するかどうかを設定する項目です。 適切なメールサーバから送信することが望ましいため、何も入力せずEnterキーを押してください。 |
| SMTP server: (smtp.mailgun.org) | 利用するSMTPサーバ名を入力してください。 |
| SMTP port: (587) | 利用するSMTPサーバ名を入力してください。 |
| SMTP username: | 利用するSMTPサーバ名を入力してください。 |
| SMTP password: | 利用するSMTPサーバ名を入力してください。 |
| SMTP authentication: (plain) | 利用するSMTPサーバ名を入力してください。 |
| SMTP OpenSSL verify mode: (Use arrow keys, press Enter to select) | 利用するSMTPサーバ名を入力してください。 |
| E-mail address to send e-mails “from”: (Mastodon ) | Mastodonから届いたメールのFROMに表示したいメールアドレスを入力してください。 |
| Send a test e-mail with this configuration right now? (Y/n) | ここまで入力したメールの設定でテスト送信するかどうかを決定する項目です。 メールの設定に失敗しているとMastodonのアカウントが作成できなくなりますので、Yを選んで確認することをおすすめします。 |
| Send test e-mail to: | テストメールを送信するメールアドレスを入力してください。 |
| Save configuration? (Y/n) | ここまでの設定内容を保存するかどうかを決定する項目です。 テストメールの配信状況などに問題が無ければ、Yを選んで保存してください。 |
| Prepare the database now? (Y/n) | Mastodon用のデータベースを構築するかどうか決定する項目です。 Mastodonイメージではデータベースが空のため、Yを押してデータベースの構築を行ってください。 |
| Compile the assets now? (Y/n) | Mastodonのウェブ表示で使用するアセットのコンパイルを行うかどうか決定する項目です。 実稼動時にかかる負荷などに影響するのでコンパイルすることをおすすめします。 |
| Do you want to create an admin user straight away? (Y/n) | Mastodonの管理者アカウントを作成するかどうかを決定する項目です。 管理者アカウントが無くても正常に利用できるので作成は任意です。 |
以下のコマンドでMastodonデーモンを起動します。
systemctl enable mastodon-sidekiq.service
systemctl enable mastodon-streaming.service
systemctl enable mastodon-web.service
systemctl start mastodon-*
上記コマンドでスタートできない旨のメッセージが表示された場合は、以下コマンドをお試しください。
systemctl start mastodon-sidekiq
systemctl start mastodon-streaming
systemctl start mastodon-web
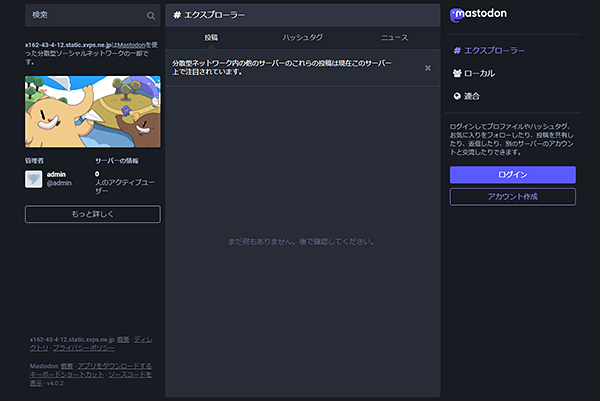
Mastodonに接続できれば設定は完了です。
\Mastodonインストールテンプレート提供/
【2024年7月1日まで】利用料金20%をキャッシュバック!初期費用無料!月額664円から使える!
まとめ
最後まで読んで頂きまして、ありがとうございました。
Xserver VPSを利用すると誰でも簡単にMastodonをインストールすることができます。
少しでも気になるという方は是非Xserver VPSを利用してみてはいかがでしょうか?
\Mastodonインストールテンプレート提供/
【2024年7月1日まで】利用料金20%をキャッシュバック!初期費用無料!月額664円から使える!
↓↓↓↓ブログ村に参加しています! 是非、応援クリックお願いします!